Thứ Sáu, 23 tháng 6, 2023

ADOBE 100k NĂM

 B1: Vào store adobe lebanon tại đây: Tại Đây Nè!!!!!

B2: Nhập Email của bạn, nếu tài khoản từng đăng ký Adobe thì nhập mật khẩu để Login

B3: Nhập thông tin thẻ thanh toán quốc tế được của bạn, nhớ để ý Country/Region là Lebanon -> Loại Tiền Tệ thanh toán bên tay phải là LL nhé (LL 356,400), không cần nhập Phone Number

B4:
- Mục đầu chọn "I am a teacher, faculty, or staff"
- Ở mục School name bạn vào đây chọn 1 trường: https://en.wikipedia.org/wiki/List_of_schools_in_Lebanon
- Mục Primary area of instruction thì chọn "Design, Web Multimedia"

Xong nhấn Submit, xong sẽ có emai xác nhận chính hãng Adobe gửi về

B5: bác nào xài thẻ chính chủ, trong vòng 15 ngày sau đó, hủy đăng ký gói (cancel subscription) để năm sau nó không trừ tiền cho năm tiếp theo nhé, vì lúc đó khá sure là Adobe đã điều chỉnh giá bán tại Lebanon, cancel subscription thôi chứ không phải refund nên năm hiện tại vẫn xài bình thường

Lưu ý:
Sở dĩ thực hiện được viện này là do đồng tiền Lebanon đang trượt giá/lạm phát kinh khủng, Adobe chưa có bước điều chỉnh giá, nên khi hệ thống ngân hàng quy đổi ra VND thì chỉ còn hơn 100k. Phần hiển thị là 356,400 LL, nếu quy đổi bằng google sẽ ra hơn 23usd, gần 500k VNĐ, nhưng thực tế khi trừ thì chỉ có 100k ( Check đây nha Currency Converter – Exchange Rate Calculator | Visa )

Nếu bị báo lỗi thanh toán thì đổi tài khoản ( đổi 4 5 lần) ko đc thì đổi thẻ hoặc đổi máy tính để mua nếu ko đc chờ 6h mua lại ok nè


Thứ Sáu, 9 tháng 6, 2023

Đổi màu Flare to export Illustrator

Gồm 2 bước: Làm trong và đổi màu

- Bước 1 thì thủ công vl, đổi opacity của 1 tới 2 điểm của gradient từng đối tượng về 0 =)))))

Cái này làm quen thì cũng nhanh, dùng Direct selection chọn, sửa xong thì khoá lại luôn để đỡ ấn nhầm.

- Bước 2 đổi màu: cái này mới phát hiện, đỉnh cao vl :v

File/Edit Color/Adjust Color.... 

Xong chỉnh RGB


Thứ Tư, 4 tháng 1, 2023

Tự kích hoạt Windows 10/11 clean

 Tự kích hoạt windows 10/11 cực sạch năm 2023

Bước 1: Gõ tìm powershell tại thanh search bar và chọn "Run as Administrator"

Post image

Bước 2: Dán vào dòng lệnh sau ---> enter

LINK: irm https://massgrave.dev/get | iex

CODE:

# Enable TLSv1.2 for compatibility with older clients

[System.Net.ServicePointManager]::SecurityProtocol = [System.Net.ServicePointManager]::SecurityProtocol -bor [System.Net.SecurityProtocolType]::Tls12

$DownloadURL = 'https://raw.githubusercontent.com/massgravel/Microsoft-Activation-Scripts/master/MAS/All-In-One-Version/MAS_AIO.cmd'
$DownloadURL2 = 'https://gitlab.com/massgrave/microsoft-activation-scripts/-/raw/master/MAS/All-In-One-Version/MAS_AIO.cmd'

$FilePath = "$env:TEMP\MAS.cmd"
$ScriptArgs = "$args "

try {
Invoke-WebRequest -Uri $DownloadURL -UseBasicParsing -OutFile $FilePath -ErrorAction Stop
} catch {
try {
Invoke-WebRequest -Uri $DownloadURL2 -UseBasicParsing -OutFile $FilePath -ErrorAction Stop
} catch {
Write-Error $_
Return
}
}

if (Test-Path $FilePath) {
Start-Process $FilePath $ScriptArgs -Wait
$item = Get-Item -LiteralPath $FilePath
$item.Delete()
}
Post image

Bước 3: Ấn vào tiêu đề cửa sổ Microsoft Activation Script ---> Gõ số 1 để tiếp tục

Post image

Mọi thứ sẽ tự động chạy, bạn không cần làm gì thêm cả. Sau khi mọi thứ đã xong như hình chỉ cần ấn nút bất kỳ là script trở về như trên, ấn phím số 0 để thoát.

Post image

Quá đơn giản đúng không nào, chúc các bạn thành công :D


BONUS: Kích hoạt gấp office:

& ([ScriptBlock]::Create((irm https://massgrave.dev/get))) /HWID /KMS-Office

Thứ Tư, 17 tháng 8, 2022

Cài fake điện thoại google pixel để backup ảnh unlimit trên Google Photos

- https://github.com/BaltiApps/Pixelify-Google-Photos

Pixelify-Google-Photos

LSPosed / EdXposed module to add Google Pixel features on Google Photos for any device.
Tested on EdXposed by Jim Wu

LSPosed module repo
Development repo

Telegram group link

Steps to use:

  1. Install Magisk, LSPosed Or EdXposed.
  2. Install the apk of this app (available from Releases page.)
  3. Open LSPosed / EdXposed app and enable the module. For LSPosed, Google Photos will be automatically selected.
  4. Reboot. Enjoy. (If needed, you might need to clear data of Google Photos app).

How does this module work?

It simply hooks on to hasSystemFeature() method under android.app.ApplicationPackageManager class. Then when Google Photos checks the relevant features which are expected only on Pixel devices, the module passes true. Thus Google Photos enables Pixel-Exclusive features.
The features being "spoofed" can be found from:
Dot OS sources
PixelFeatureDrops magisk module
This module can also spoof some of the build.prop information like BRANDMANUFACTURERMODELFINGERPRINT of some Pixel devices.

Disclaimer!!

The user takes sole responsibility for any damage that might arise due to use of this module.
This includes physical damage (to device), injury, data loss, and also legal matters.
This project was made as a learning initiative and the developer cannot be held liable in any way for the use of it.


LSPosed Framework

https://github.com/RikkaApps/Riru/releases

Supported Versions

Android 8.1 ~ 13 Beta 1

Install

  1. Install Magisk v23+ (Riru) / v24+ (Zygisk)
  2. (For Riru flavor) Install Riru v25+ from Magisk repo
  3. Download and install LSPosed in Magisk app
  4. Reboot
  5. Follow the prompt to add LSPosed shortcut to launcher
    • Some launchers won't show a prompt but silently add the shortcut
    • If the shortcut cannot be added, you can install the manager located at /data/adb/lspd/manager.apk manually
    • If you accidentally deleted the shortcut, reboot your device or install the manager manually to add the shortcut again
    • If you don't need a shortcut, install the manager manually and you can disable future shortcut being added in the settings
    • In any case, you can dial *#*#5776733#*#* (aka LSPosed) to launch the manager if you have a dialer
  6. Have fun :)

Download

For stable releases, please go to Github Releases page For canary build, please check Github Actions Note: debug builds are only available in Github Actions.

Sửa Nox để root được Magisk

- Cần Terminal Emulator
- Magisk Delta: https://huskydg.github.io/magisk-files/

Fix mount:

Method 1:

  1. Connect your phone to the computer. (Make sure USB debugging is enabled on your phone)

  2. Open CMD/Terminal on your PC.

    • Windows: CTRL + R, then type cmd.

    • Ubuntu: CTRL + ALT + T.

    • Mac: Navigate to /Applications/Utilities/ and double-click on Terminal.

  3. Type this:

    1. adb shell

    2. su

    3. Choose one: (for security mount /system back to RO when finished)

      • Mount system RW: mount -o rw,remount /system
      • Mount system RO: mount -o ro,remount /system

Method 2:

  1. Open terminal on your android phone (download here):

  2. Type this in the terminal:

    1. su

    2. Choose one: (for security mount /system back to RO when finished)

      • Mount system RW: mount -o rw,remount /system
      • Mount system RO: mount -o ro,remount /system

Thứ Năm, 7 tháng 7, 2022

Script download public video/watch/reels facebook

 /**

** Author: @MonokaiJs
** Contact: monokaijs@northstudio.vn | https://fb.me/monokaijssss | monokaijs.com
**
** Free to use, but don't abuse :>
**/

(()=>{let a=location.href.match(/\/(?:videos|reel|watch)(?:\/?)(?:\?v=)?(\d+)/);if(a.length<2){console.log("Please open a video before running this script.");return}let c=function(d,e){let f=[],a;for(a in d)if(d.hasOwnProperty(a)){let g=e?e+"["+a+"]":a,b=d[a];f.push(null!==b&&"object"==typeof b?c(b,g):encodeURIComponent(g)+"="+encodeURIComponent(b))}return f.join("&")},b=function(a,b){return fetch("https://www.facebook.com/api/graphql/",{method:"POST",headers:{"content-type":"application/x-www-form-urlencoded"},body:c({doc_id:a,variables:JSON.stringify(b),fb_dtsg:require("DTSGInitialData").token,server_timestamps:!0})})};console.log("Getting info..."),b("5279476072161634",{UFI2CommentsProvider_commentsKey:"CometTahoeSidePaneQuery",caller:"CHANNEL_VIEW_FROM_PAGE_TIMELINE",displayCommentsContextEnableComment:null,displayCommentsContextIsAdPreview:null,displayCommentsContextIsAggregatedShare:null,displayCommentsContextIsStorySet:null,displayCommentsFeedbackContext:null,feedbackSource:41,feedLocation:"TAHOE",focusCommentID:null,privacySelectorRenderLocation:"COMET_STREAM",renderLocation:"video_channel",scale:1,streamChainingSection:!1,useDefaultActor:!1,videoChainingContext:null,videoID:a[1]}).then(a=>a.text()).then(b=>{try{let a=JSON.parse(b.split("\n")[0]),c=a.data.video.playable_url_quality_hd||a.data.video.playable_url;console.clear(),console.log("\u2705 Successfully retrieved download link."),console.log("======================="),console.log("%cClick this link to download: "+c,"color: green"),console.log("If your browser does not download automatically, please press Ctrl+S on your keyboard after followed the link above."),console.log("======================="),console.log("\u{1F37A} If you like me tool, gimme a follow at https://fb.me/monokaijssss !! Thank yeww <3")}catch(d){console.log("\u26A0\uFE0FFailed to extract data. Maybe this script is no longer effective.")}}).catch(a=>{console.error("\u26A0\uFE0FFailed to get data")})})()

Thứ Hai, 11 tháng 5, 2020

Hướng dẫn cách gỡ khiểu nại bản quyền video trên Youtube - Mẹo để xóa khiếu nại bản quyền trên Youtube và bật kiếm tiền an toàn

Hướng dẫn cách gỡ khiểu nại bản quyền video trên Youtube

Trong số kho nhạc AudioJungle trên, một số file có kèm theo file license (dạng .txt hoặc .pdf) để xác thực quyền sở hữu bản quyền đối với file âm thanh đó.

Nếu bạn sử dụng các file âm thanh có license mà nhận được cảnh báo vi phạm bản quyền đối với video trên Youtube hãy làm theo 1 trong 2 cách sau:

LIÊN HỆ YOUTUBE:

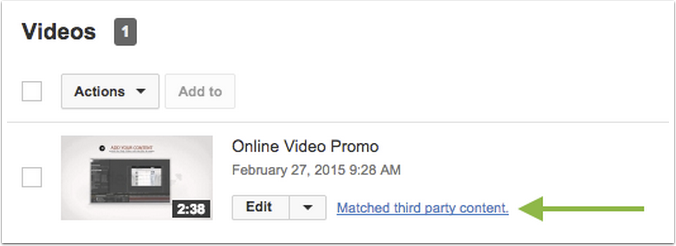
Để xóa khiếu nại qua Youtube, bạn chỉ cần cho Youtube biết rằng bạn có quyền sử dụng nó cho video của mình. Click vào thông báo bản quyền nội dung bên thứ ba phù hợp bên cạnh video trong Trình quản lý video của bạn hoặc trên trang thông báo bản quyền.

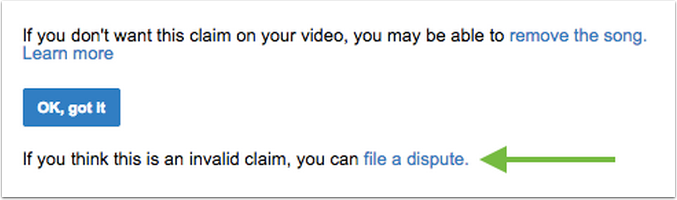
Click vào gửi tranh chấp.

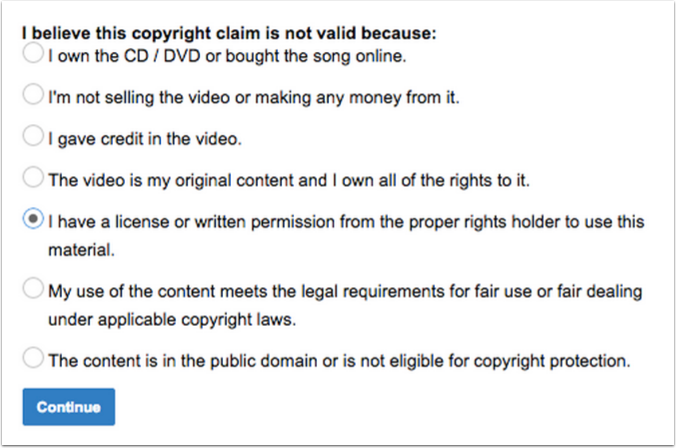
Chọn Tôi có giấy phép hoặc sự cho phép bằng văn bản từ chủ sở hữu quyền để sử dụng tài liệu này.

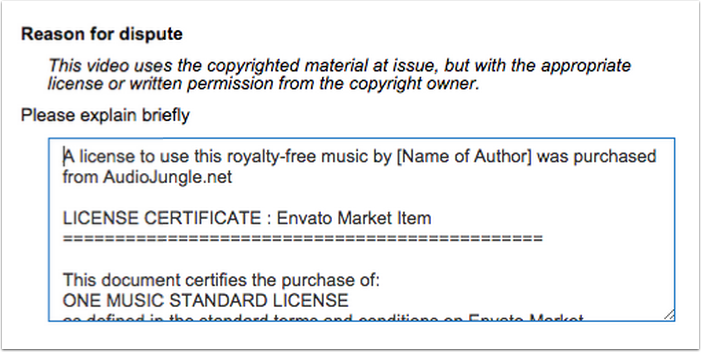
Trong phần Lý do tranh chấp, paste nội dung từ file license. Bạn có thể bổ sung thêm dòng: A license to use this royalty-free music by [điền tên tác giả] was purchased from AudioJungle.net. (Tạm dịch: Giấy phép sử dụng bản nhạc miễn phí bản quyền này của [Tên tác giả] đã được mua từ AudioJungle.net)

Khi bạn gửi tranh chấp, khiếu nại thường được xóa trong vòng 24 – 96 giờ sau khi Youtube xác minh thành công.


LIÊN HỆ ADREV:

Nếu video bị khiếu nại bản quyền thông qua hệ thống AdRev, hãy truy cập trang AdRev Claim Clearance để điền form yêu cầu gỡ khiếu nại bản quyền với video của bạn.

  • Điền tên, email, link video Youtube bị AdRev khiếu nại bản quyền.
  • Phần Subject chọn mục To have a claim released (attach license)
  • Phần Chọn tệp hãy đính kèm file license
  • Ở phần Message hãy trả lời nội dung cung cấp cho họ các thông tin tương tự như trên để AdRev hiểu bạn có quyền sử dụng file âm thanh đó và bấm Send để hoàn tất

Nếu không giỏi tiếng Anh bạn có thể copy phần sau paste vào Message: This video uses the copyrighted material at issue, but with the appropriate license or written permission from the copyright owner. (Tạm dịch: Video đang bị đánh dấu bản quyền này sử dụng tài liệu có giấy phép thích hợp hoặc sự cho phép bằng văn bản của chủ sở hữu bản quyền.)

AdRev là hệ thống tự động quét vi phạm bản quyền với các sản phẩm nội dung mà hệ thống bảo vệ. Nếu bạn chứng minh được mình có quyền sử dụng các sản phẩm đó thì AdRev sẽ xóa bỏ khiếu nại với Youtube. Họ sẽ gửi email thông báo cho bạn nếu xác minh và gỡ khiếu nại bản quyền đối với video của bạn thành công.


Mẹo để xóa khiếu nại bản quyền trên Youtube và bật kiếm tiền an toàn

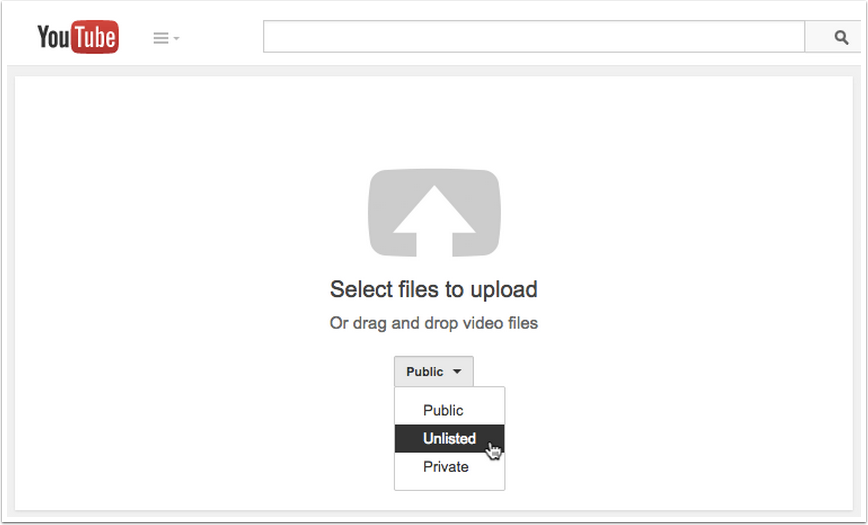
Hãy tải video lên YouTube ở chế độ Không công khai cho đến khi tất cả thông báo nội dung của bên thứ ba phù hợp bị xóa. Điều này giúp bạn có thêm thời gian để mọi thông báo bản quyền bị xóa trước khi video được xuất bản và bạn có thể kiếm tiền từ video của mình từ thời những view đầu tiên mà không có bất kỳ gián đoạn nào. Sau khi thông báo bản quyền đã bị xóa, hãy thay đổi trạng thái video thành Công khai và tính năng kiếm tiền sẽ được kích hoạt.